
Gear Review: "Movo VS7" Mini Stabilizer Pro
Poor Man's "SteadiCam"
Handheld Mini Camera/ Camcorder Stabilizer. For cameras and camcorders weighting up to 6.6 lbs. Specifications: Maximum size: 3.9" x 3.1" x 16.1", Minimum size: 3.9" x 3.1" x 11.7" Camera mount thread: 1/4" x 20. Product weight ( -w/ out counterweights ): 1 lb. Product weight ( -with all counterweights): 2.53 lbs. Includes rugged zippered fabric carry bag. Covered by 1-year Movo warranty. USA-based customer support.
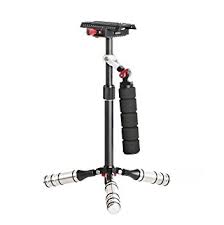
Movo's "VS7" Mini Handheld Camera/ Camcorder Stabilizer Pro provides micro-budget film makers with an attractive, affordable alternative to pricier stabilizers ( -like the "Steadicam Merlin 2" ).
How does it fare against those competitors? Pretty nicely actually, based upon my early practice sessions with the unit. While certain- ly not perfect, this solidly built stabilizer provides fairly professional results with practice. Bottom line: give it serious consideration!
Background
I'd been looking for a good, moderately priced camera stabilizer for my Nikon CoolPix L-830. Then, I stumbled across Movo's "VS7" on Amazon. The price had been discounted to $149.95 ( -from the standard retail price of $199.95 ). There were only a few left in-stock. So, after reading a couple of the ( mostly positive ) Amazon reviews on it ( -and after viewing an impressive demo of the unit's capabilities on YouTube -posted by a "VS7" owner ),I decided to take the plunge and order one. I'm glad I did!
Disappointed with other low-cost camera stabilizers I'd purchased in the past, I wasn't expecting much when the Movo "VS7" arrived. To my delight my initial skepticism began fading as I opened the well made black and red zippered fabric carry-bag housing the system ( -nice touch! ). While the folded stabilizer fit snugly ( -almost too snugly ) in the bag -I could see that it and it's contents were of unusually high quality. I sighed a breathe of relief. However, I still wasn't completely sold. How difficult was this thing going to be to balance and learn? Was I looking at a long "learning curve" mastering this thing? Once again, I could feel my stomach tightening with dread at the thought of what lie ahead of me.
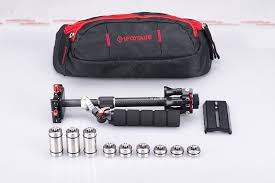
Movo's "VS7" comes in an attractive black and red zippered carry-bag/ fanny pack ( -that you can cinch around your waist with it's belt ), the stabilizer itself, three ( large ) "feet" weights, six ( smaller ) screw-on end weights ( -forming the unit's tripod ), and a quick release plate ( -with a 1/4" x 20 mounting screw ). The unit's machined aluminum, carbon-fiber and heavy steel weights make for a rugged and "classy" looking stabilizer.
Assembly, balancing and "swing -test"
I perused the manual's ( -two photocopied pages ) of awkward, almost comically tortured "English" instruct-ions. At that point -dreading the long "balancing session" ahead -I thought I could use a laugh, so I chuckled through the "manual's" more humorous passages. Here are a few gems: "Unlock and lock the weights feet Loose the locking screw of the triangular fixed plate to an unlock position" and "Note: tighten the quick re-lease locking screw on the head will protect the camera from sliding over and fail down". Kind of funny. However, after translating the instructions into proper English, I found they were pretty straight-forward. I doubt that anyone who's messed with a stabilizer in the past will have trouble figuring them out. Newbies, not so sure...
Be careful however when doing the "swing test" part of the balancing procedure -making sure the quick-release plate ( -with your attached camera ) are firmly attached to the head plate ( -by carefully tightening the quick-release locking screws til they're snug ) before allowing the head ( -with QR plate and your mounted camera ) to swing from the horizontal to vertical position. You don't want your unsecured camera to fall onto the floor! Just check and make sure everything's snugly mounted before proceeding.
One thing the instructions warn against is overtightening the locking screws or lock sleeve's axis tightening nut. They work well and will become snug without overtightening ( -which can damage them ). One other caveat I'll pass along is this: Periodically check to make sure the steel counterweights are fully screwed to-gether. Again, there's no need for overtightening ( -just make sure they're fully screwed together and snug ). I've found that they have a tendency to loosen while using the unit in the field. Other than that, simply follow the maintainance recommendations ( -on cleaning and drying the unit ). Common sense stuff.
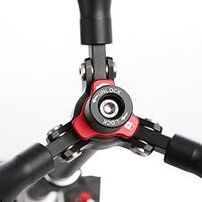
By adjusting the Movo "VS7's'" bottom locking screw, you can position it's "triangular fixed plate" into either storage or use positions. It works simply and effectively. Note the "lock" and "unlock" arrows in the picture.
All of the "VS7's" parts have a solid "quality feel" to them. On whole, the stabilizer seems well-designed, appearing to cost more than it actually does. A rarity in today's marketplace!
Balanced settings....
So, how would I rate the assembly/ balancing procedure? Tolerable, I guess. It took me about an hour to get my fully loaded ( i.e: 4 x AA batteries and SDHC card inside, lens cap and neck strap attached ) Nikon L-830 digital camera to balance correctly. After following the manual's "broken English" instructions as far as I could tolerate, I reverted to instinct and "fine tuned" the system on my own. It appears to have worked so I'm satisfied. One thing to note here is that my L-830 only weighs 2.1 lbs ( loaded ), which is pretty light ( -and probably near the bottom end of the "VS7's" camera-weight range ). None the less, it worked -so cool.
My Nikon L-830 required these settings in order to "balance": Quick-release plate mounted so that just a sliver of it's rear edge protruded ( -about an eigth-inch ) past the L-830's folded LCD screen with 2 1/4" of QR plate extending beyond the L-830's lens cap. The QR plate's white arrow pointing to about "14" on it's ( numbered ) scale when the left and right locking screws were tightened. All counterweights ( i.e: the large 144 gram inner most one, plus the 51 gram middle and 37 gram end cap weights ) mounted on each of the unit's three tripod "feet" ). A "loose" setting of the hand grip's "tooth-joint" lock ( -to avoid knuckle-bumping on the lock sleeve shaft ). And lastly, the lock sleeve's "axis" ( -tightening nut ) twisted snug at the "30" mark of it's scale. Obviously, your camera may require different settings.

The Movo "VS7's" head plate ( -with Quick-Release plate ), left and right locking screws and red "locating screw" lever shown. What's really nice about the "VS7's" head plate, quick-release plate and axis ( -tightening nut ), are the precise numbered scale markings ( -provided for accurately adjusting and locking your "balanced" camera settings ). Jot down these settings on an index card you can store in the carry bag ( -so you can skip most of the "balancing procedure" the next time you use it! ).
First tests....
My first tests of the Movo "VS7" Mini Stabilizer Pro were conducted indoors. I just walked down our hallway into each room and circled back out again to the next room and ended up circling the living room before com-ing back to the kitchen where I'd originally started from. What I learned early on was that walking straight paths with this stabilizer was fairly easy. Making turns with it ( -especially sharp turns ) was a real "bear" to get right. Most times the camera over-spun where I'd intended the "center" of my shot to go.
I experimented with several ways to overcome this turning problem. Trying to "guide" the stabilizer's head plate ( w/ QR plate and mounted camera ) into my turns ( -by pinching the lock sleeve's shaft with the forefinger and thumb of my camera grip hand ). Slightly guiding the tip of one of the counterweight's tripod legs into and out of my turns - using my freehand. Using the thumb of my camera grip hand to judiciously "guide" the stabilizer's head plate ( w/QR plate and mounted camera ) into and out of my turns, etc.
Of these three methods, the last one ( -using the thumb of my camera grip hand to judiciously "guide" the stabilizer's head plate and mounted camera assembly into and out of turns -by exerting thumb pressure to the back of the head plate ) seemed to work best. But it requires a deft touch to get right. Practice -practice -practice! So, I tried a few more circuits of my house using this "thumb technique". It worked pretty good but I still need more practice to make my turns look "professional".
The Movo "VS7'" gimbal and "tooth-joint" lock ( -below which is the padded hand grip ). The gimbal works very smoothly but you have to be cognizant of it's tendency to spin on the lock sleeve shaft -a bit past the "center" of your scene when making turns ( -especially sharp turns ). To combat this, apply moderate thumb pressure to the back of the head plate when going into and coming out of your turns. Once you're past the turn you can ease your thumb pressure on the back of the head plate. Straightaways are pretty easy. But practice, practice, practice!
A day in the park....
A few days after my initial tests, we were blessed with a truly glorious spring day. I thought it would be the perfect day to shoot some outdoor footage for my "Tiny Synths, Mighty Sounds" documentary. So me and my younger sister headed out to Sunset Park, to give the "VS7" a thorough workout. I began by planning a long stabilizer shot ( -that would have me snaking through a stand of pines and up a hill to a paved circle lookout area that peered out upon a sweeping vista of the Missouri River and farmlands beyond ).
I tried walking the route with my "VS7-mounted" Nikon L-830. Results: terrible! Had I already forgotten the lessons learned in my initial test? Nope, but the serpentine path through the pine stand had some really sharp turns. They challenged my beginner prowess. On a lark, I asked my sister to retrace my route, to see if she ( -a complete stabilizer newbie ), could do any better. I mentioned the "thumb-guiding" tip and asked her to "shadow" me ( -a few feet in back and to my right ) as I negotiated the pine stand route up to the grassy knoll within the paved circle drive.
To my amazement, she "aced" the difficult course with near-professional video results! "What the hell!"
I exclaimed as we both viewed the playback footage ( -on the L-830's LCD screen ). Her first try and she was "golden". I didn't get it. I'm supposed to be the "video guy" in our family. Yet she creamed me on her first attempt! I was mystified and embarrassed. My little sis had outdone me at what I'm good at!

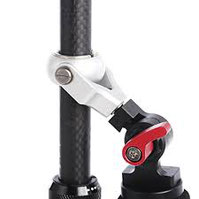
The "VS7's'" axis ( tightening nut ). It allows you to adjust the length of the stabilizer's lock sleeve shaft to accomodate different cameras. My Nikon L-830 balanced nicely at the "30" setting. Depending on your camera's weight, your camera may require a different setting. What's nice however, is that the "VS7" provides you with accurate ( embossed ) markings ( -which you can then use to remember where your camera balanced best at ). Just twist the nut to lock the position. No need to overtighten!
Some people just got it....
So, thinking this was just a fluke -I challenged her to do it again. Guess what? She did. Sure, there was a point or two in each "take" where a "baubble" or two could be seen -but the overall takes were near epic! Smooth and genuinely engaging. Take that "Steadicam!" Needless to say, I was impressed. I actually said to her, "I think you ought to consider a new career as a "Steadicam" operator!". She said she was just fine as a baker.
So, how do I account for this astounding difference? Well, I guess "some people just "got it"! I, apparently "don't". But that's not going to keep me from practicing with the "VS7" til I get it right. No WAY am I going to let my little sister "one up" me at something I'm supposed to be good at! That's just NOT going to happen! Once I get better at this, I think there's going to be a "stabilizer showdown" between me and her ( -with a free Burger King or Jack in the Box meal on the line as the prize ). Yeah, I know we're big-time spenders.
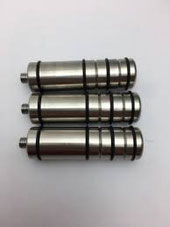
The "VS7's" ( 3 ) steel counterweight feet screwed together. When screwed on to the stabilizer, these serve as both weights AND as a tripod base ( -allowing you to temporarily set the "VS7" down ).
*NOTE: A lot of low-cost stabilizers don't have this convenience feature. It's one of the thoughtful design details that give the "VS7" the "edge" over competing units in my opinion. You'll genuinely appreciate this feature after a long day of doing outdoor stabilizer shots!
Getting "golden"
So, just to clarify: You may be one of those naturally-gifted people ( -like my sister ) who takes to the "VS7" straight-away and is "golden" the first time you try it. More likely however, you'll need to practice with the unit and gradually acquire your stabilizer skills ( -like I'm doing ). Another thing I've found is that you'll need to adjust your gait to minimize your "side-to-side" ( i.e: left to right ) swaying when walking with the "VS7". I find that walking smoothly and a bit "pigeon-toed" ( -heel in front of toes ) tends to help. Experiment, and watch your camera's LCD screen when walking with the unit til you find your smoothest gait.
With lots of practice you should pick it up. Another thing to remember is that you'll need to walk-through your shot ( -from it's beginning to it's end ) in order to find the proper zoom lens setting ( -for framing ) and exposure before you go for a "take". If your shot covers lots of ground, you'll need to find the zoom framing ( i.e: wide, medium, tight, etc. ) that works best throughout the entirety of your shot. You won't be able to adjust this when you're walking!
Same thing for exposure. For example: If you're working outdoors -a long shot may take you from shade to bright sunlight or anything in between. By walking through your shot ahead of time you'll be able to select the best "overall" settings ( -that accomodate these changes ). With these preparations and lots of practice, you should be able to pull off some truly epic stabilizer shots with the "VS7". Believe me, when done right a stabilizer shot can literally pull your audience into the picture in a way that few other things can!

Fully balanced and ready-to-go! A DSLR mounted on the "VS7" Mini Stabilizer Pro. This set-up puts the micro budget film maker in the driver's seat for some truly epic stabilized camera moves!
The "VS7" is a great little stabilizer at a very reasonable price. The unit is both well-designed and sturdy. It looks way more expensive than it really is. Highly recommended. I hope Movo continues to make this model for a long time to come!
The competition. Some final thoughts....
So, how does Movo's "VS7" fare against the competition? Pretty nicely I think. Prior to owning the "VS7", I owned a Revo ST-500 handheld Video Stabilizer. For it's price ( -around $60.00 ), it wasn't too bad. However, it can't compare to the "VS7". I've also seen online demos of Steadicam's "Merlin 2" ( -which retails for around $249.00 ) on B&H Photo's website. Frankly, I don't think this higher-priced Steadicam produces video any better than what my sister did using the "VS7". In fact, I'd give the "VS7" a slight edge over the "Merlin 2". Heresy I know but true.
So bottom line: If you're looking for a reasonably priced camera stabilizer and want something ruggedly built and capable of some really nice results -the Movo "VS7" is the unit I'd recommend. While you'll pro- bably have to do some practice with it before you get good with it -I think it's time well spent. I really hope Movo continues making this stabilizer ( -because there's really nothing like it in this price range ). I'd rank Movo's "VS7" as a "Biggest-Bang- for-the-Buck" must have accessory for the low-budget film maker. Nuff said.